Archive for the ‘ mysql ’ Category

Drop connection from mysql


Script to create database school.


CREATE DATABASE school;

Script to create, insert and return data from student table


-- Create table
CREATE TABLE student
(
	id int NOT NULL AUTO_INCREMENT,
	FirstName varchar(255) NOT NULL,
	PRIMARY KEY (id)
);

-- Insert data;
INSERT INTO student(FirstName) values('Sara');
INSERT INTO student(FirstName) values('Kyle');
INSERT INTO student(FirstName) values('John');

-- Access student data;
SELECT * FROM student;

How to see currently active connection information. Do the below:

select * from information_schema.processlist;

How to disconnect:

Kill <id-from-processlist-table>;

What was used:

  • Mysql which was installed with XAMPP v.3.2.1. Which is Server version: 5.6.24 MySQL Community Server (GPL)
  • Windows 8.1
  • Netbeans 8.0.2

Reference:


NOTE
The sample maven project used for this exercise can be downloaded from

drop

Simple jsf with jpa

Create database and table in myql using netbeans (part 1)

Part 1

Creating datasource in Glassfish. Generating jpa in Netbeans. (part 2)

Part 2

jsf using jpa (part 3)

Part 3

The source code of Manager java class used in the video(Part 3) above:

      public class Manager {

        EntityManagerFactory emf = Persistence.createEntityManagerFactory(“florist”);
        EntityManager em = emf.createEntityManager();
        EntityTransaction entityTransaction = em.getTransaction();

        public List getAllUsers() {
            TypedQuery query = em.createNamedQuery(“User.findAll”, User.class);
            List results = query.getResultList();
            return results;
        }
      }

The source code of Bean java class used in the video(Part 3) above:

      public class Bean {
        private Manager mgr;

        public Bean() {
            mgr = new Manager();
        }

        public String getUsers() {
            List users = mgr.getAllUsers();

            String userNames = “”;
            for (User user : users) {
                 userNames += user.getId()+” “;
            }

            return userNames;
        }
      }


NOTE:
The sample project used for this exercise can be cloned from git: https://gitlab.com/greenhorn/jsf-jpa.git


Reference:

How to create oneToMany relationship on JPA.

How oneToMany relationship will look on a ERD diagram?

One-to-many er cardinality photo CountyCitizen.png

How OneToMany relationship will look on sql tables creation statements?

The below is the sql statement which shows on how to make oneToMany relationship tables. But we won’t be needing this. The persistence.xml used for this exercise is configured to create the table based on the annotated classes.

create table `Country` (
    `country_id` INT(5) not null primary key auto_increment,
    `name` VARCHAR(100),
    `currency` VARCHAR(30)
)
 
create table `citizen` (
    `citizen_id` INT(14) not null primary key auto_increment,
    `name` varchar(100),
    `address` varchar(200),
    `nationality` int(5) not null,
    Foreign key(nationality) references `country` (country_id)
)

How to code oneToMany relationship using javax.persistence.api annotation?

There has been 3 classes created for this:

  1. Citizen.java

    : represent the citizen table. Many citizen can belong to one country. citizen has many to one relationship with country.

    package org.world.entity;
    
    import javax.persistence.Column;
    import javax.persistence.Entity;
    import javax.persistence.Id;
    import javax.persistence.JoinColumn;
    import javax.persistence.Column;
    import javax.persistence.ManyToOne;
    
    /**
     * @see http://docs.oracle.com/javaee/6/api/javax/persistence/Entity.html
     */
    @Entity(name = "citizen")
    public class Citizen implements java.io.Serializable {
    
        /**
         * @see http://docs.oracle.com/javaee/6/api/javax/persistence/Id.html
         * @see http://docs.oracle.com/javaee/6/api/javax/persistence/Column.html
         */
        @Id
        @Column(insertable=true, unique=true, length=225, updatable=true)
        private Integer citizen_id;
    
        /**
         * @see http://docs.oracle.com/javaee/6/api/javax/persistence/ManyToOne.html
         * @see http://docs.oracle.com/javaee/6/api/javax/persistence/JoinColumn.html
         */
        @ManyToOne
        @JoinColumn(name = "country_id")
        private Country country;
        @Column
        private String name;
        @Column
        private String address;
    
        public Citizen() {
        }
    
        public Integer getCitizen_id() {
            return citizen_id;
        }
    
        public void setCitizen_id(Integer citizen_id) {
            this.citizen_id = citizen_id;
        }
    
        public Country getCountry() {
            return country;
        }
    
        public void setCountry(Country country) {
            this.country = country;
        }
    
        public String getName() {
            return name;
        }
    
        public void setName(String name) {
            this.name = name;
        }
    
        public String getAddress() {
            return address;
        }
    
        public void setAddress(String address) {
            this.address = address;
        }
    }
    
  2. Country.java

    : represent country table. One country have many citizen, hence country has one to many relationship with citizen table.

    package org.world.entity;
    
    import java.util.Set;
    import javax.persistence.CascadeType;
    import javax.persistence.Column;
    import javax.persistence.Entity;
    import javax.persistence.Id;
    import javax.persistence.OneToMany;
    
    @Entity
    public class Country implements java.io.Serializable {
    
        @Id
        @Column(name="country_id")
        private Integer country_id;
        
        /**
         * @See http://docs.oracle.com/javaee/6/api/javax/persistence/OneToMany.html"
         */
        @OneToMany(cascade={CascadeType.ALL}, mappedBy = "country")
        private Set citizen;
    
        @Column
        String name;
    
        @Column
        String currency;
    
        public Country(){}
    
        public String getCurrency() {
            return currency;
        }
    
        public void setCurrency(String currency) {
            this.currency = currency;
        }
    
        public String getName() {
            return name;
        }
    
        public void setName(String name) {
            this.name = name;
        }
    
        public Integer getCountry_id() {
            return country_id;
        }
    
        public void setCountry_id(Integer country_id) {
            this.country_id = country_id;
        }
    
        public Set getCitizen() {
            return citizen;
        }
    
        public void setCitizen(Set citizen) {
            this.citizen = citizen;
        }
    }
    
  3. PersistentOperator.java

    : This class has the java main method which creates and inserts mock data into citizen and country tables.

    package org.world.manager;
    
    import org.world.entity.Citizen;
    import org.world.entity.Country;
    import javax.persistence.EntityManager;
    import javax.persistence.EntityManagerFactory;
    import javax.persistence.EntityTransaction;
    import javax.persistence.Persistence;
    
    public class PersistentOperator {
        /**
         * @See http://docs.oracle.com/javaee/6/api/javax/persistence/EntityManagerFactory.html
         * @See http://docs.oracle.com/javaee/6/api/javax/persistence/Persistence.html
         * @See http://docs.oracle.com/javaee/6/api/javax/persistence/EntityManager.html
         */
        EntityManagerFactory emf = Persistence.createEntityManagerFactory("JpaExample");
        EntityManager em;
    
        public void insert() {
    
            //--------------Sample data --------------
            Citizen citizen1 = new Citizen();
            Citizen citizen2 = new Citizen();
            Citizen citizen3 = new Citizen();
            Citizen citizen4 = new Citizen();
    
            Country country1 = new Country();
            country1.setCountry_id(123);
            country1.setName("Brazil");
            country1.setCurrency("Brazilian real");
    
            Country country2 = new Country();
            country2.setCountry_id(234);
            country2.setName("Ghana");
            country2.setCurrency("Ghana cedi");
    
            citizen1.setName("William");
            citizen1.setCitizen_id(345);
            citizen1.setCountry(country1);
            citizen1.setAddress("No 1, Street 1.");
    
            citizen2.setName("Sophie");
            citizen2.setCitizen_id(456);
            citizen2.setCountry(country1);
            citizen2.setAddress("No 2, Street 2.");
    
            citizen3.setName("Julia");
            citizen3.setCitizen_id(567);
            citizen3.setCountry(country2);
            citizen3.setAddress("No 3, Street 3.");
    
            citizen4.setName("Len");
            citizen4.setCitizen_id(678);
            citizen4.setCountry(country2);
            citizen4.setAddress("No 4, Street 4.");
    
            //--------------Sample data --------------
    
            em = emf.createEntityManager();
            EntityTransaction entityTransaction = em.getTransaction();
    
            try {
                entityTransaction.begin();
    
                em.persist(country1);
                em.persist(country2);
                em.persist(citizen1);
                em.persist(citizen2);
                em.persist(citizen3);
                em.persist(citizen4);
    
                entityTransaction.commit();
            } catch (Exception e) {
                e.printStackTrace();
                entityTransaction.rollback();
            }
        }
    
        public static void main(String[] args) {
            PersistentOperator po = new PersistentOperator();
    
            po.insert();
        }
    }
    
  4. The configuration is managed in persistence.xml file:

    <?xml version="1.0" encoding="UTF-8"?>
    <persistence version="1.0" 
                 xmlns="http://java.sun.com/xml/ns/persistence" 
                 xmlns:xsi="http://www.w3.org/2001/XMLSchema-instance" 
                 xsi:schemaLocation="http://java.sun.com/xml/ns/persistence http://java.sun.com/xml/ns/persistence/persistence_1_0.xsd">
      <persistence-unit name="JpaExample" transaction-type="RESOURCE_LOCAL">
        <provider>org.hibernate.ejb.HibernatePersistence</provider>
        <class>org.world.entity.Citizen</class>
        <class>org.world.entity.Country</class>
        <properties>
          <property name="hibernate.connection.username" value="root"/>
          <property name="hibernate.connection.driver_class" value="com.mysql.jdbc.Driver"/>
          <property name="hibernate.connection.password" value=""/>
          <property name="hibernate.connection.url" value="jdbc:mysql://localhost:3306/world?zeroDateTimeBehavior=convertToNull"/>
          <property name="hibernate.cache.provider_class" value="org.hibernate.cache.NoCacheProvider"/>
          <property name="hibernate.hbm2ddl.auto" value="create-drop"/>
        </properties>
      </persistence-unit>
    </persistence>
    

    For this exercise, mysql database has been used. Once the PersistentOperator.java class was run, data will be populated into world database schema. The world database has to be created in mysql before running PersistetOperator.java. But the table is not necessarily has to be created. It won’t harm if the tables were already exist as well. The data in the tables would look like below.

    Country table:

    country_id currency name
    123 Brazil real Brazil
    234 Ghana cedi Ghana

    Citizen table:

    citizen_id address name country_id
    345 No 1, Street 1. William 123
    456 No 2, Street 2. Sophie 123
    567 No 3, Street 3. Julia 234
    678 No 4, Street 4. Len 234

    End.

    References:

    NOTE!
    The sample maven project used for this exercise can be downloaded from

    jpa-world

Installing mysql on Ubuntu 12 04 LTS using tar.gz distribution

Between 2:57 and 3:00, I mentioned that “I will create a softlink”. I was wrong, it is actually a symbolic link. My apology.

Import CSV data into mysql database table

The commands used by the video above are as below:

-- Create new table ----
Create table application1(
application_id varchar(28) not null,
status varchar(15),
application_age int(3),
primary key(application_id)
)

-- Create data in a file called "application1_data.csv" to be loaded into mysql ---
a1,active,18
b1,closed,28
c1,unactive,38

-- Load the data in to the created databse table application1. --
load data local infile '/home/cpt2ms3/Desktop/application1_data.csv' into table application1
fields terminated by ','
enclosed by'"'
lines terminated by '\n';

-- select statement to detect the loaded data --
select * from application1;

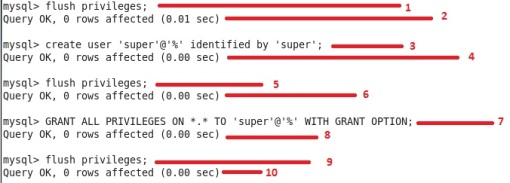
mysql super user creation steps.

User creation steps from terminal

Figure 1.0

The numbering(in red) from the above Figure 1.0 is explained below:

1, 5, 9. The server caches information in memory as a result of GRANT, CREATE USER , CREATE SERVER, and INSTALL PLUGIN statements. This cached memory can be freed by “flush privileges” command.
2, 4, 6, 8, 10. Acknowledgment message from server.
3. Create user with username ‘super’ and host ‘%’. The host ‘%’ indicate its a wildcard. That means this user ‘super’ can log into the mysql server from any remote client. This ‘super’ user is not tied to any particular host. If this line gives error message try again after restarting mysql.
7. GRANT ALL privileges to user ‘super’ at host ‘%’.

Next, restart the server to make sure the changes took effect.

restart mysql server

Figure 2.0

The numbering(in red) from the above Figure 2.0 is explained below:
11, 13. If the start and stop script is configured in linux, the start and stop server can be done accordingly.
12, 14. Linux acknowledgement message.

Referance:
http://dev.mysql.com/doc/refman/5.6/en//adding-users.html
http://centoshelp.org/servers/database/installing-configuring-mysql-server/

Sample:

CREATE USER 'greenhorn'@'%' IDENTIFIED BY 'greenhorn';
CREATE USER 'greenhorn'@'localhost' IDENTIFIED BY 'greenhorn';
GRANT ALL PRIVILEGES ON *.* TO 'greenhorn'@'%' WITH GRANT OPTION;
GRANT ALL PRIVILEGES ON *.* TO 'greenhorn'@'localhost' WITH GRANT OPTION;

Installed Mysql on CentOS 6.3

Step 1: Installing mysql

yum install mysql mysql-server

Step 2: Change user to root on linux

su root


Step 3: Start MySQL server daemon (mysqld):

chkconfig –level 2345 mysqld on; service mysqld start


Step 4: Login as root database admin to MySQL server:

mysql -u root


Step 5: Change root database admin password: (note: once this step is complete you’ll need to login with: mysql -p -u root)

mysql> SET PASSWORD FOR ‘root’@’localhost’ = PASSWORD(‘mypass’);

Query OK, 0 rows affected (0.00 sec)

mysql> FLUSH PRIVILEGES;

Query OK, 0 rows affected (0.00 sec)


Step 6: Delete ALL users who are not root:

mysql> delete from mysql.user where not (host=”localhost” and user=”root”);

Query OK, 4 rows affected (0.01 sec)

mysql> FLUSH PRIVILEGES;

Query OK, 0 rows affected (0.00 sec)


How to stop the mysql instance from terminal?

service mysqld stop

How to check if mysql instance is running? If the below returns nothing that means no instance of mysql-server is running

ps -e|grep mysqld

Reference: http://centoshelp.org/servers/database/installing-configuring-mysql-server/

Create password for user in mysql

The image above explains itself

Installing mysql zip distribution on Windows 7 Enterprise.

Step1: Download the zip distribution as shown in the Figure 1.

Figure 1: Download the zip distribution.

Step 2: Extract the zip distribution into preferred location as shown in Figure 2.

Extract zip to prefered installation directory

Figure 2: Extract zip to prefered installation directory

Step 3: Add the installation directory of mysql to windows “Path” environment variable. See Figure 3 below.

Figure 3: Add the extracted mysql directory to the Path environment variable

Step 4: Is the final step. Open command prompt. Type in “mysql”(See Figure 4). This will open the normal user account.

Figure 4: Login as a ordinary user

OR

Alternative 4 step: Open command prompt. Type in “mysql -u root”. See Figure 5. This will open the super user account.

Figure 5: Login as a root user.

Platform used:
– Windows 7 Enterprise 64 bit.
– Mysql 5.5.28

Sample Mysql database and table creation from command prompt