html <select> with Restful data in Angular

  1. Import the below modules in app.module.ts.

HttpModule

ReactiveFormsModule

changes in app.module.ts are as below:

import { BrowserModule } from '@angular/platform-browser';
import { NgModule } from '@angular/core';
import { FormsModule, ReactiveFormsModule } from '@angular/forms';
import { HttpModule } from '@angular/http';

import { AppComponent } from './app.component';

@NgModule({
  declarations: [
    AppComponent
  ],
  imports: [
    BrowserModule,
    FormsModule,
    HttpModule,
    ReactiveFormsModule
  ],
  providers: [],
  bootstrap: [AppComponent]
})
export class AppModule { }
  1. Managing form controls in app.component.ts typescript file. Changes are as below:
import { Component, OnInit } from '@angular/core';
import { Http } from "@angular/http";
import { FormGroup, FormBuilder, FormArray, FormControl } from "@angular/forms";
import { Subscription } from "rxjs/Subscription";

@Component({
  selector: 'app-root',
  templateUrl: './app.component.html',
  styleUrls: ['./app.component.css']
})
export class AppComponent implements OnInit {
  
  // property which will hold our form
  private formOption: FormGroup = new FormGroup({})

  // property which will hold the data for the <select> <option>
  private supportedSheduledTypes: FormArray = new FormArray([]);
  private schedulerTypeSubscription: Subscription;

  constructor(private http: Http, private fb: FormBuilder) {
  }

  ngOnInit() {
    // Fetch list of hero to be used in drop down and keep it as an instance veriable.
    this.fetchDefaultSupportedSchedledTypes();

    this.formOption = this.fb.group({
      scheduleTypes: this.supportedSheduledTypes
    });
  }

  /**
   * Fetch list of hero to be used in drop down and keep it as an instance veriable.
   */
  fetchDefaultSupportedSchedledTypes() {
    this.schedulerTypeSubscription = this.http.get('https://greenhorn-c7a65.firebaseio.com/hero.json').subscribe(
      (response) => {
        const data = response.json();
        this.supportedSheduledTypes = this.createFormArrayForScheduledTypes(data);
      },
      (error) => {
        console.log('error: ' + error);
      }
    );
  }

  /**
   * Create and FormArray of the given list of hero's
   * 
   * @param fetchedScheduleTypes 
   */
  createFormArrayForScheduledTypes(fetchedScheduleTypes: any): FormArray {
    let scheduledTypes = new FormArray([]);
    console.log('fetchedScheduleTypes length: ' + fetchedScheduleTypes.length);
    for (let entry in fetchedScheduleTypes) {
      console.log(fetchedScheduleTypes[entry]);
      scheduledTypes.push(new FormControl(fetchedScheduleTypes[entry]));
    }
    return scheduledTypes;
  }

  get scheduleTypes(): FormArray {
    return this.supportedSheduledTypes as FormArray;
  }

  onSelectType(htmlElement: any) {
    let element = htmlElement;
    console.log('element id: ' + element.value);
  }

  ngOnDestroy(): void {
    this.schedulerTypeSubscription.unsubscribe();
  }
}

  1. Changes to synchronize our typescript form to our app.component.html file:
<form [formGroup]="formOption">
  <select id="select" name="select" class="form-control" size="1" (change)="onSelectType($event.target)">
    <option 
      id="scheduleTypes_{{scheduleType.value.id}}" 
      *ngFor="let scheduleType of scheduleTypes.controls; index as i" 
      [value]="scheduleType.value.id">{{scheduleType.value.name}}
  </option>
  </select>
</form>

Username and password encryption in Spring boot application properties file

  1. Generating the encrypted value:

– Download and extract from http://www.jasypt.org/download.html

– Run the below from the bin of the extracted download:

encrypt.bat input="testuser" password=MY_PASS

  1. Added dependency to the project:

        <dependency>
            <groupId>com.github.ulisesbocchio</groupId>
            <artifactId>jasypt-spring-boot-starter</artifactId>
            <version>1.14</version>
        </dependency>

  1. Using encrypted username/password in properties.yml:

– Place the generated text between “ENC(” and “)”

– Build the project.

  1. Running your project using spring-boot:run:

– Run the below from project directory:

mvn spring-boot:run -Djasypt.encryptor.password=MY_PASS

  1. Running project’s jar:

– Run the below from project target directory:

java -jar target\jasypt-test-0.0.1-SNAPSHOT.jar --jasypt.encryptor.password=MY_PASS

Rest client with RestTemplate Spring

The first project contains “REST service”

1. Create project from “Spring initialz” with 3 dependencies:

a. Web

b. Actuator (Optional)

2. A REST Controller.

@RestController
public class EmployeeController {
    
    @RequestMapping(path = "/employee")
    public @ResponseBody Map<String, String> getEmployee(@RequestBody JsonNode jsonNode){
        String name = jsonNode.get("name").asText();
        System.err.println("[Calling][getEmployee][name]"+name);
        Map<String, String> namefEmployee = new HashMap<>();
        namefEmployee.put("Name of Employee", name);
        return namefEmployee;
    }
}

3. Run mvn spring-boot:run to start the service.

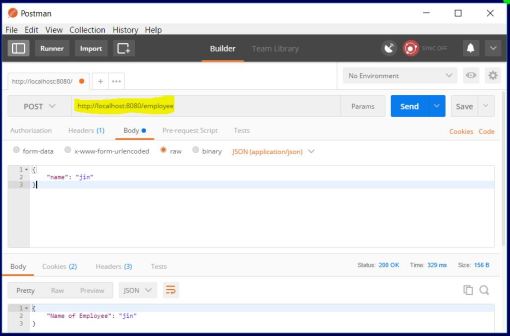
4. Testing with Postman client.
Client to test the exposed REST service.

The second project contains “REST service client which uses “RestTemplate

1. Create project from “Spring initialz” with 3 dependencies:

a. Web

b. Actuator (Optional)

2. Additional maven dependencies.

<dependency>
    <groupId>org.apache.httpcomponents</groupId>
    <artifactId>httpclient</artifactId>
</dependency>
<dependency>
    <groupId>com.fasterxml.jackson.core</groupId>
    <artifactId>jackson-databind</artifactId>
</dependency>

see full pom.xml
3. RestTemplate sample usage

import java.net.URISyntaxException;
import org.apache.http.client.config.RequestConfig;
import org.apache.http.impl.client.CloseableHttpClient;
import org.apache.http.impl.client.HttpClientBuilder;
import org.springframework.http.HttpEntity;
import org.springframework.http.HttpHeaders;
import org.springframework.http.HttpMethod;
import org.springframework.http.MediaType;
import org.springframework.http.ResponseEntity;
import org.springframework.http.client.ClientHttpRequestFactory;
import org.springframework.http.client.HttpComponentsClientHttpRequestFactory;
import org.springframework.http.converter.StringHttpMessageConverter;
import org.springframework.web.client.RestTemplate;

public class SpringRestClient {

    private final RestTemplate restTemplate;

    public SpringRestClient() {
        ClientHttpRequestFactory requestFactory = getClientHttpRequestFactory();
        this.restTemplate = new RestTemplate(requestFactory);
        restTemplate.getMessageConverters().add(new StringHttpMessageConverter());
    }

    public void sendRequest2() throws URISyntaxException {
        String requestJsonString = "{ \"name\": \"user1\"}";

        String requestUrl = "http://localhost:8080/employee";

        // set headers
        HttpHeaders headers = new HttpHeaders();
        headers.setContentType(MediaType.APPLICATION_JSON);
        HttpEntity<String> entity = new HttpEntity<String>(requestJsonString, headers);

        // send request and parse result
        ResponseEntity<String> restResponse = restTemplate
                .exchange(requestUrl, HttpMethod.POST, entity, String.class);

        System.err.println("response string: " + restResponse.getBody());
    }

    private ClientHttpRequestFactory getClientHttpRequestFactory() {
        int timeout = 60000;
        RequestConfig config = RequestConfig.custom()
                .setConnectTimeout(timeout)
                .setConnectionRequestTimeout(timeout)
                .setSocketTimeout(timeout)
                .build();
        CloseableHttpClient client = HttpClientBuilder
                .create()
                .setDefaultRequestConfig(config)
                .build();
        return new HttpComponentsClientHttpRequestFactory(client);
    }
}

3. Run mvn spring-boot:run to test the project.

Code sample:
RestTemplate-Sample

Using Spring boot application as dependency in another Spring boot application project

<build>
	...
	<plugins>
		...
		<plugin>
			<groupId>org.springframework.boot</groupId>
			<artifactId>spring-boot-maven-plugin</artifactId>
			<executions>
				<execution>
					<goals>
						<goal>repackage</goal>
					</goals>
					<configuration>
						<classifier>exec</classifier>
					</configuration>
				</execution>
			</executions>
		</plugin>
		...
	</plugins>
    ...
</build>

Sample usage:

Code sample:
spring-boot-as-dependency

Enabling Web STOMP Plugin on RabbitMQ with windows 10

References:

  1. RabbitMQ Web STOMP Plugin

Spring Boot Basic HTTP Authentication

Confession:

  1. I don’t know how spring security really works. I’m just sharing a attempt which worked for me. If you find any better approach to achieve this, please do share. I would love to know.


Steps are…

1. Create project from “Spring initialz” with 3 dependencies:

a. Web

b. Security

c. Actuator (Optional)

2. The sample service to get user from database/data store:

@Service
public class UserService {
    Map<String, String> mapUserWthId = new HashMap();

    public UserService() {
        mapUserWthId.put("a1", "A");
        mapUserWthId.put("a2", "B");
        mapUserWthId.put("a3", "C");
        mapUserWthId.put("a4", "D");
    }

    /**
     * Assuming that this will fetch from a database .
     */
    public String getUserNameByID(String userId) {
        return mapUserWthId.get(userId);
    }
}

3. The authentication provider (Check reference for details):

@Component
public class CustomAuthenticationProvider implements AuthenticationProvider {

    private static final Logger LOGGER = Logger.getLogger(CustomAuthenticationProvider.class.getName());

    @Autowired
    private UserService userService;

    @Override
    public Authentication authenticate(Authentication authentication)
            throws AuthenticationException {

        String name = authentication.getName();
        String password = authentication.getCredentials().toString();

        // Should check with database or some services for authentication
        if (userService.getUserNameByID(name) != null) {
            LOGGER.log(Level.INFO, "User [{0}] authorize!", name);
            return new UsernamePasswordAuthenticationToken(
                    name, password, new ArrayList<>());
        } else {
            LOGGER.log(Level.INFO, "User [{0}] not authorize!", name);
            return null;
        }
    }

    @Override
    public boolean supports(Class<?> authentication) {
        return authentication.equals(
                UsernamePasswordAuthenticationToken.class);
    }
}

4. The security configuration:

@Configuration
@EnableWebSecurity
public class SpringSecurityConfig extends WebSecurityConfigurerAdapter {
 
    @Autowired
    private CustomAuthenticationProvider authProvider;
 
    @Override
    protected void configure(HttpSecurity http) throws Exception {
        http.csrf().disable()
                .authorizeRequests().anyRequest().authenticated()
                .and().httpBasic();
    }
 
    @Override
    protected void configure(AuthenticationManagerBuilder auth) throws Exception {
        auth.authenticationProvider(authProvider);
    }
}

5. The Rest controller:

@RestController
public class GreetingController {
 
    @RequestMapping(value = "/greetings/{name}", method = RequestMethod.GET)
    public @ResponseBody String getGreetingMessage(@PathVariable("name") String name) {
        return "Hello user: "+ name;
    }
}

6. Testing by navigating to the blow:

http://localhost:8080/greetings/greenhorn

7. End

References:

  1. Spring Security:
    1. boot-features-security
  2. Authentication Provider:
    1. www.baeldung.com/spring-security-authentication-provider
    2. dzone.com/articles/spring-security-custom


Source Code:
The sample spring boot maven project used for this exercise can be downloaded from:

basic-authentication-sample-1

liquibase migration on spring boot startup (SpringLiquibase)

Prerequisites:

  1. mysql database available to be used. I’m using jdbc:mysql://localhost:3306/liquibase_test
  2. I’m using Netbeans. Other IDE also can be used.


Steps are…

  1. Create project from “Spring initialz” with 3 dependencies:
  2. a. liquibase

    b. mysql

    c. jpa

  1. Open generated project in netbeans.
  1. Change application.properties to application.yml and paste the content below in it.
    spring:
        datasource:
            driver-class-name: com.mysql.jdbc.Driver
            url: jdbc:mysql://localhost:3306/liquibase_test 
            username: greenhorn
            password: greenhorn
            
    liquibase:
        check-change-log-location: true
        enabled: true
    
  1. Create and insert the below in “db.changelog-test.xml” file and place the file in src/main/resources/db/mysql/changelog (create if the directory doesn’t exist):
    <?xml version="1.0" encoding="UTF-8"?>
    <databaseChangeLog xmlns="http://www.liquibase.org/xml/ns/dbchangelog" xmlns:ext="http://www.liquibase.org/xml/ns/dbchangelog-ext" xmlns:xsi="http://www.w3.org/2001/XMLSchema-instance" xsi:schemaLocation="http://www.liquibase.org/xml/ns/dbchangelog-ext http://www.liquibase.org/xml/ns/dbchangelog/dbchangelog-ext.xsd http://www.liquibase.org/xml/ns/dbchangelog http://www.liquibase.org/xml/ns/dbchangelog/dbchangelog-3.5.xsd">
        
        <changeSet author="generated" id="tbl-1">
            <createTable tableName="test_tbl">
                <column name="tblId" type="VARBINARY(36)">
                    <constraints nullable="false"/>
                </column>
                <column name="createdDate" type="datetime">
                    <constraints nullable="false"/>
                </column>
                <column name="updatedDate" type="datetime"/>
                <column name="fk_createdBy" type="VARBINARY(36)">
                    <constraints nullable="false"/>
                </column>
                <column name="fk_updatedBy" type="VARBINARY(36)"/>
                <column name="active" type="BIT(1)"/>
                <column name="deleted" type="BIT(1)"/>
                <column name="content" type="VARCHAR(255)">
                    <constraints nullable="false"/>
                </column>
                <column name="version" type="INT"/>
            </createTable>
        </changeSet>
        
        <changeSet author="generated" id="tbl-2">
            <addPrimaryKey columnNames="tblId" constraintName="PRIMARY" tableName="test_tbl"/>
        </changeSet>
    </databaseChangeLog>
    
  1. Create LiquibaseConfig.java file and paste the content below in it:
    @Configuration
    public class LiquibaseConfig {
    
        @Autowired
        private DataSource dataSource;
    
        @Autowired
        private ResourceLoader resourceLoader;
    
        @Bean
        public SpringLiquibase liquibase() throws Exception {
            //      Locate change log file
            String changelogFile = "classpath:db/mysql/changelog/db.changelog-test.xml";
            Resource resource = resourceLoader.getResource(changelogFile);
    
            Assert.state(resource.exists(), "Unable to find file: " + resource.getFilename());
            // Configure Liquibase
            SpringLiquibase liquibase = new SpringLiquibase();
            liquibase.setChangeLog(changelogFile);
            liquibase.setDataSource(dataSource);
            liquibase.setDropFirst(true);
            liquibase.setShouldRun(true);
    
            // Verbose logging
            Map<String, String> params = new HashMap<>();
            params.put("verbose", "true");
            return liquibase;
        }
    }
    
  1. Execute the project using mvn spring-boot:run
  1. Examine the database in jdbc:mysql://localhost:3306/liquibase_test
  1. End.


NOTE
The sample spring boot maven project used for this exercise can be downloaded from:

liquibase-spring

References:

  1. programcreek SpringLiquibase


sql file execution on spring boot startup

Prerequisites:

  1. mysql database available to be used. I’m using jdbc:mysql://localhost:3306/mybatis_test
  2. I’m using Netbeans. Other IDE also can be used.


Steps are…

  1. Create project from “Spring initialz” with 3 dependencies:
  2. a. mybatis

    b. mysql

    c. jpa

  1. Open generated project in netbeans.
  1. Add spring data source details in the “application.properties” file:
    spring.datasource.url = jdbc:mysql://localhost:3306/mybatis_test
    spring.datasource.username = greenhorn
    spring.datasource.password = greenhorn
    spring.datasource.driver-class-name=com.mysql.jdbc.Driver
    
  1. Create and insert the below in “schema.sql” file and place the file in the src/main/resources directory:
    DROP TABLE IF EXISTS `test_tbl`;
    
    CREATE TABLE `test_tbl` (
    	  `testId` varbinary(36) NOT NULL,
    	  `fk_createdBy` varbinary(36) NOT NULL,
    	  `fk_updatedBy` varbinary(36) DEFAULT NULL,
    	  `createdDate` datetime NOT NULL,
    	  `updatedDate` datetime DEFAULT NULL,
    	  `active` bit(1) DEFAULT NULL,
    	  `deleted` bit(1) DEFAULT NULL,
    	  `customReferenceNo` varchar(100) DEFAULT NULL,
    	  PRIMARY KEY (`testId`)
    ) ENGINE=InnoDB DEFAULT CHARSET=latin1;
    
  1. Add the below codes to the Main java class:
        public class MybatisSpringApplication implements CommandLineRunner {
        ...
    
        @Autowired
        private DataSource datasource;
    
        @Override
        public void run(String... args) throws Exception {
            String script = "C:\\Users\\greenhorn\\Desktop\\mybatis-spring\\src\\main\\resources\\schema.sql";
    
            // Approch 1: using native way to create instance of Connection
            ScriptRunner scriptRunner = new ScriptRunner(
                    DriverManager.getConnection("jdbc:mysql://localhost:3306/mybatis_test", "greenhorn", "greenhorn"));
    
            // Approch 2: using spring boot injected DataSource to get the connection
            //ScriptRunner scriptRunner = new ScriptRunner(datasource.getConnection());
            scriptRunner.runScript(new BufferedReader(new FileReader(script)));
        }
        ...
    
  1. Execute the project using mvn spring-boot:run
  1. Examine the database in jdbc:mysql://localhost:3306/mybatis_test
  1. End.


NOTE
The sample spring boot maven project used for this exercise can be downloaded from:

mybatis-spring

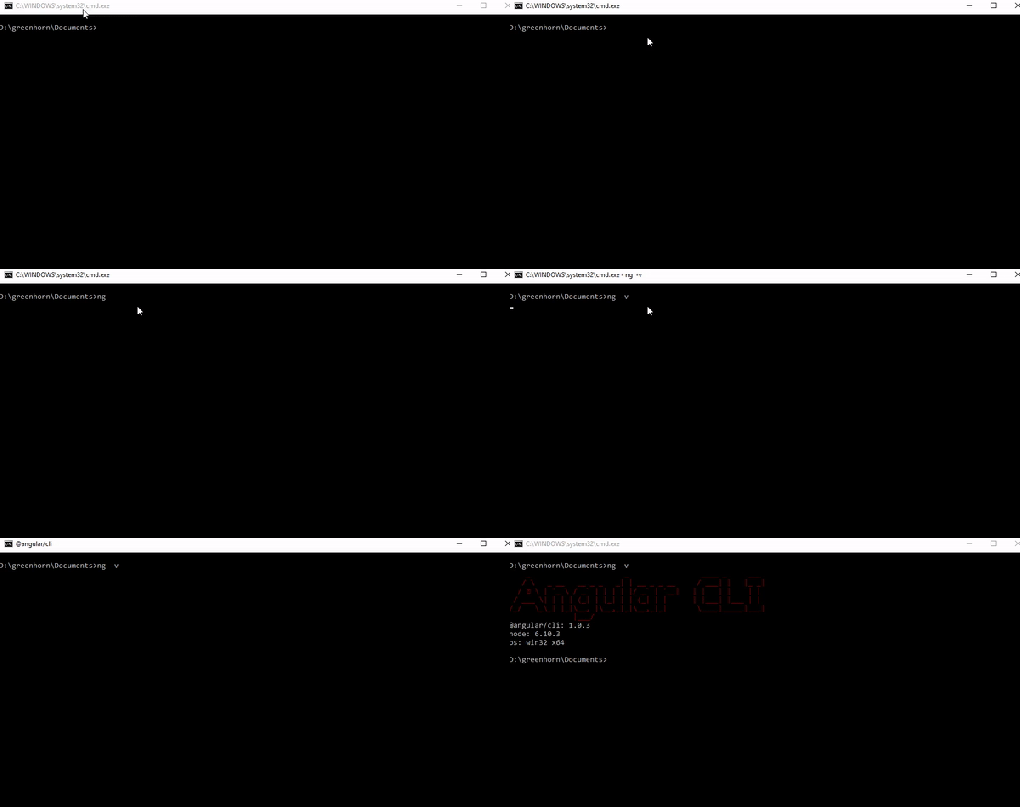
Checking Angular version in Command Prompt

Checking Angular version in Command Prompt

The command prompt, command to check version:

ng -v

Websocket with Spring-boot

Used curl command in git-bash:

curl localhost:8080/send/message -d “message=Hello World”

project used: websockets-try-5